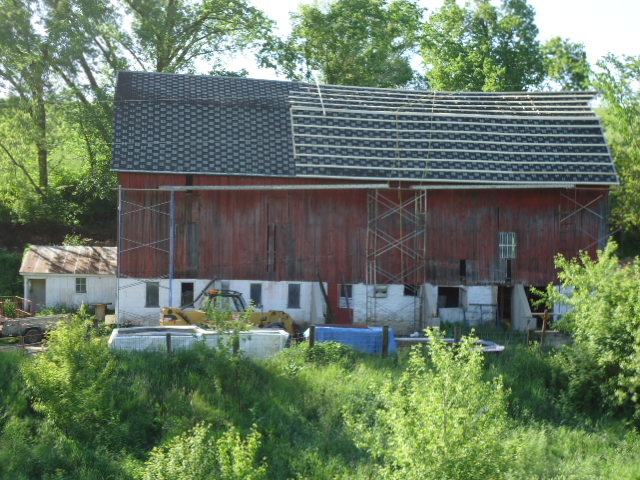
A springtime pizza featuring the gorgeous La Quercia Iowa White Spread, caramelized pear, asparagus and WI Sheep Dairy Cooperative Pecorino, and small amount of cubed mozzarella.
I made a whole wheat pizza crust. Heated oven to 500 degrees and put baking stone on the top rack. Turn broiler on for ~10 mins once oven is heated and prior to baking pizza. (Cook's Illustrated tip! - it really heats up the stone.)
After rolling out the crust and another slight rise (I make rectangular pizzas - fits better on the peel, the stone, and the cooling rack). Baked empty crust for 3-4 mins; just enough to 'toughen up' the crust. Remove and let cool.
I spread the Iowa White spread, pear, asparagus and shaved Pecorino and a small amount (approx. 1/4 cup) of small cubes of mozzarella. Bake until golden. It was spectacular.
And for Susan - here's a photo of the barn cats.
Friday, May 10, 2013
Sunday, April 7, 2013
How to make a goat shoulder
In preparation for raising our own food, I'm embracing the challenge of cooking the cuts of our intended livestock. At the Platteville winter market last week, lo and behold, I found goat for sale! Raised locally by a mother/daughter team in Potosi, Glasson Valley shows and raises Boer goats. I purchased a goat shoulder.
I liked the method of Popartichoke so I based our prep on her method - plus we just happened to have homemade harissa in the fridge. (As a side note, I found Popartichoke in searching for goat recipes - a lot of good stuff and recipes on that blog, definitely worth checking out!)
Recipe for Goat Shoulder *Dutch oven is a necessity for this dish!
(Recipe adapted from Popartichoke)
Rub
3 T salt
generous grinds of black pepper
1 1/2 t. oregano
1 t. chopped rosemary
1 t. olive oil
2 T. Harissa (homemade)
1 1/2 t. cumin
1 t. turmeric
2 lb goat shoulder
Rub mixture on goat. Let rest in fridge for at least 2 hours (or overnight). Remove at least 1 hour before preparation.
Mirepoix
2 carrots, diced
1 large onion, diced
~1/2 C dicked celeraic
sprigs of fresh rosemary
1 to 2 bulbs (whole bulbs, not cloves) of garlic. Remove cloves and clean from 1 bulb. Cut off the top 1/4-1/3 of the remaining whole bulb (as if you were going to roast it, and include the entire bulb in the mixture in the dutch oven. Again, gotta give credit to Megg at Popartichoke, here - I love this idea!
1 to 3 bay leaves
1.5 to 2 C of red wine (or more) :)
2 C chicken stock
1 C water
Preheat oven to 250.
In dutch oven on the stovetop, brown veggies in batches in the grease leftover from your morning pancetta breakfast omelet (No? your breakfast didn't include pancetta? sorry, it was delicious!) or sunflower oil. Start with carrots and celeriac and brown slightly. Remove and brown onion slightly. Remove.
Turn dutch oven to high. Brown the goat. Really get in there and brown it - don't be shy. Get all of the sides and edges. When turning, scrape any rub that falls off from bottom of pan and save on a plate. Remove once browned. Turn off stovetop heat. Deglaze dutch oven with some red wine. Add veggies. Add goat, the rub that fell off during cooking and liquids.
Cover and put in oven for 2 hours.
After 2 hours, remove cover, flip meat, increase heat to 300, and cook for another 45-60 mins.
When meat is tender and falling from the bones, remove from oven. Remove the meat from the dutch oven and cover on a plate. If you can find the bay leaves, remove them and the whole garlic bulb. Using your stick blender, combine the mirepoix ingredients until a gravy forms.
Serve with couscous or rice.
I liked the method of Popartichoke so I based our prep on her method - plus we just happened to have homemade harissa in the fridge. (As a side note, I found Popartichoke in searching for goat recipes - a lot of good stuff and recipes on that blog, definitely worth checking out!)
Harissa rub on the goat cut - let rest for a couple of hours in the fridge
Mirepoix ingredients, browned
Ready to go in the oven
After a couple of hours.
Browned and tender
Resting - note the whole garlic bulb!
Mixing the mirepoix
Recipe for Goat Shoulder *Dutch oven is a necessity for this dish!
(Recipe adapted from Popartichoke)
Rub
3 T salt
generous grinds of black pepper
1 1/2 t. oregano
1 t. chopped rosemary
1 t. olive oil
2 T. Harissa (homemade)
1 1/2 t. cumin
1 t. turmeric
2 lb goat shoulder
Rub mixture on goat. Let rest in fridge for at least 2 hours (or overnight). Remove at least 1 hour before preparation.
Mirepoix
2 carrots, diced
1 large onion, diced
~1/2 C dicked celeraic
sprigs of fresh rosemary
1 to 2 bulbs (whole bulbs, not cloves) of garlic. Remove cloves and clean from 1 bulb. Cut off the top 1/4-1/3 of the remaining whole bulb (as if you were going to roast it, and include the entire bulb in the mixture in the dutch oven. Again, gotta give credit to Megg at Popartichoke, here - I love this idea!
1 to 3 bay leaves
1.5 to 2 C of red wine (or more) :)
2 C chicken stock
1 C water
Preheat oven to 250.
In dutch oven on the stovetop, brown veggies in batches in the grease leftover from your morning pancetta breakfast omelet (No? your breakfast didn't include pancetta? sorry, it was delicious!) or sunflower oil. Start with carrots and celeriac and brown slightly. Remove and brown onion slightly. Remove.
Turn dutch oven to high. Brown the goat. Really get in there and brown it - don't be shy. Get all of the sides and edges. When turning, scrape any rub that falls off from bottom of pan and save on a plate. Remove once browned. Turn off stovetop heat. Deglaze dutch oven with some red wine. Add veggies. Add goat, the rub that fell off during cooking and liquids.
Cover and put in oven for 2 hours.
After 2 hours, remove cover, flip meat, increase heat to 300, and cook for another 45-60 mins.
When meat is tender and falling from the bones, remove from oven. Remove the meat from the dutch oven and cover on a plate. If you can find the bay leaves, remove them and the whole garlic bulb. Using your stick blender, combine the mirepoix ingredients until a gravy forms.
Serve with couscous or rice.
Sunday, March 24, 2013
Farmers got talent!
A few weeks ago 3 Flat Acres participated in a farmer fashion show as part of a Chicago area farmer talent show at the Hideout in Chicago. This is my fall 'garlic planting' ensemble, please note the muddy knees.
It was a lot of fun and we even got a write up in Grist!
http://grist.org/food/curtain-kale-farmers-get-jiggy-with-it-to-support-local-csas/
It was a lot of fun and we even got a write up in Grist!
http://grist.org/food/curtain-kale-farmers-get-jiggy-with-it-to-support-local-csas/
Sunday, December 2, 2012
3 Flat Acres is interviewed by CRAFT!
We were recently interviewed by CRAFT (Collaborative Regional Alliance for Farmer Training). See our interview here:
Interview with 3 Flat Acres
Wednesday, October 24, 2012
2013 Garlic Crop is in
My garlic popping station
During my week of vacation from my day off-farm job, we planted next year's garlic crop. We doubled the amount that we planted last year: ~4800 to ~10,000. That is 22 100 ft beds; each bed has 3 rows. It's a lot of garlic! And of course it rained almost all week but we planted anyway - thankful for rain gear!
a bit hard to see, but the wooden stakes are the variety markers
The new addition to the house is moving along.
And the barn cats are doing nicely. They are great companions while working.
Oscar on top of the straw bales
Saturday, September 8, 2012
Cabbage!
Our cabbage experiment - direct seeded in the field - worked pretty well. Next year I'll go back to transplanting seedlings, but since we were moving year during seedling starting time we put them straight into the field.
We are dreaming of homemade kraut.
Monday, September 3, 2012
House Update
The house construction is moving along. The basement and crawl space walls have been repaired, tuck pointed and/or re-poured and all have been sprayed with structural foam. The basement floor has also been repoured - after Bill and some helpers dug down an additional 10" in the basement and hauled it up and out. Tomorrow brings a crew of carpenters to help Bill pull off the old roof, reframe and prepare for the new roof. This week also brings the excavator to dig the foundation for the addition (a/k/a the new house where we will live) - we hope the foundation will be poured early next week.
The gray is the exterior foam which is structural. The yellow are interior foundation walls which only need insulating
Interior shot. The space where the ladder is going down will be the commercial kitchen (at grade) and a basement underneath
Labor Day found us seeding cover crops. Bill cultivated with the tractor on Fields 1, 2, 4, 9 and 11. I followed behind with the hand seeder. 1 and 2 got white clover while 4, 9, and 11 got a mixture of peas, oats, vetch, winter rye, and crimson clover; which will be tilled in next spring. Fields 1 and 2 will be replanted with garlic in - yikes - 6 weeks.
The drought has claimed a fair number of our orchard trees, planted this spring. We anticipate a 50% survival rate.
The barn cats are settling in nicely.
All 4 sleeping
(Left to right: Sylvia, Mr. White, Oscar, Thomas)
Labels:
barn cats,
cover crops,
fields,
orchard,
vetch
Subscribe to:
Posts (Atom)
